5.1 - Introduction to Rendering
The Big Picture
In the previous chapters you have learned the programming languages and environments needed to create WEBGL 3D graphics (HTML, CSS, & JavaScript), you have learned the basics of modeling virtual worlds, and you have learned how to create triangular mesh models using Blender. Now the real fun begins! You are ready to learn how to render your models in a scene using WebGL.
First, you should understand the basic nature of WegGL. WebGL is an API (application programmer interface) to a GPU (graphics processing unit). A GPU is a hardware device that is optimized for rendering real-time 3D graphics. You will be writing shader programs that are compiled into hardware instructions that execute at lightning speed. The WebGL API is not optimized for programmers; it is optimized for fast hardware rendering. WebGL commands literally “flip switches” in the hardware to connect circuitry. Don’t expect high-level commands. The WebGL API is a very low-level set of commands that control hardware level functionality.
When programming WebGL programming you need to separate pre-processing operations, which typically happen only once, with processing that must happen for each individual rendering of an animation frame. As you study the following descriptions of the rendering process, ask yourself when and why each task is performed.
Pre-processing: WebGL Setup
At a high level of abstraction, the pre-processing steps needed for rendering are as follows:
- Get the HTML canvas element you will be rendering into.
- Get a WebGL context for the canvas element, which is typically called
gl. - Set the desired state for the
glcontext (e.g, the background color). - Compile and link a vertex shader and a fragment shader into a rendering program. (More than one rendering program can be created.)
- For each model in your scene:
- Convert your OBJ or PLY model data into appropriate
Float32Arrayobjects for rendering. - Create one or more buffer objects in the GPU’s memory.
- Copy the
Float32Arrayobjects (i.e, the model data) into the buffer object(s).
- Convert your OBJ or PLY model data into appropriate
- Get references to the variables in your shader rendering programs so you can set their values at render time.
An example of these pre-processing steps can be studied in the following WebGL program (specially lines 123-164).
An example of using lines to outline the triangles that compose a model. Or render a "wireframe" view of a model.
Animate
Draw the edges of the triangles using a gl.LINE_LOOP
Render the model as a "wireframe"
Render the global axes (x:red, y:green, z:blue)
A Brief Introduction to Shader Programs
Before we discuss the specific steps for rendering models, we need to discuss some
basic ideas behind shader programs. There are two stages in the graphics pipeline
that you must program yourself. You write programs in GLSL (GL Shader
Language), compile them to machine instructions, link them into a “program”,
download the program to the GPU, and then activate the program when you render
a scene. The result of a rendering is a 2D array of pixels stored in a draw buffer.
Many pieces of data are stored and manipulated for each pixel. The group
of data associated with a single pixel is called a fragment. When you
see the word fragment, think “pixel and its associated rendering data.”
Please recognize that in a perspective world view, the number of fragments that are
created to render an individual triangle will constantly change based on the
distance between the virtual camera and the triangle. A rendered triangle
might require hundreds, or even thousands, of fragments because the virtual
camera is very close to the triangle. Or, if the virtual
camera is far removed from a triangle, the triangle might be rendered
with only one or two fragments.
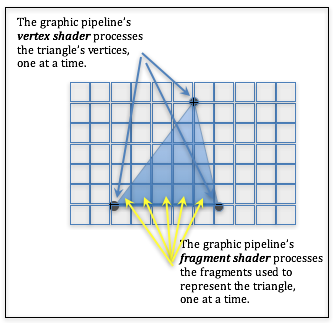
Your two shader programs have a very limited scope of functionality:
- A vertex shader transforms each vertex of a model to its correct location for the current scene.
- A fragment shader assigns a color to each fragment (pixel) that composes a point, line, or triangle.
That sounds simple enough, and it can be very simple. You can create shader programs that perform their required functionality in a single line of code. Or you can do amazing manipulations using very complex algorithms. The beauty of shader programs is that you have total control over the graphics process.
Note that vertex and fragment shaders share variables. A vertex shader will often setup values for the fragment shader to use. This will become clearer as we study shader programs in more detail over the following lessons.
Shader programs use three types of data. Data that is the same for an entire
model, data that changes for each vertex, and
data that changes for each fragment of a point, line, or triangle.
These three types of data are:
uniform |
A data value that is the same for an entire execution of the graphics
pipeline. For example, if you are going to assign the same color to
every processed vertex, then that color could be a uniform
variable. When you think of a uniform value, think of a fixed,
unvarying, unchanging value. |
attribute |
A data value that changes for every vertex as the graphics
pipeline is processing vertices. A typical attribute value is
the (x,y,z) location of a vertex. When you think of an
attribute value, always include vertex with the term, as in
vertex attribute. |
varying |
A data value that changes for every fragment as the graphics
pipeline is processing fragments. For example, a
varying variable allows every pixel that composes a point,
line or triangle to be assigned a different color. When you think of
a varying value, always include fragment with the
term, as in varying fragment. |
Rendering Steps
Each time you render your scene, WebGL has automatically initialized its context by:
- Setting every pixel in the draw buffer to the color you set using
gl.clearColor(r,g,b,a), and - Clearing the depth buffer (if hidden surface removal has been enabled).
Your JavaScript program must perform the following steps:
- For each model in your scene:
- Select your shader program.
- Pass the values of your
uniformvariables to your shader program. - Attach each shader
attributevariable to an appropriate buffer object. - Call the WebGL
gl.drawArrays()function.
The following diagram will help you visualize the steps needed to render an individual model.
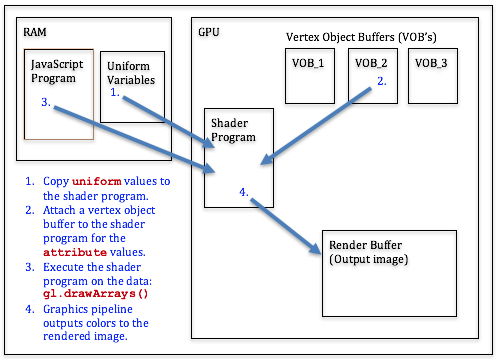
Steps for rendering a model.
The remaining lessons in this chapter explain the details of these rendering steps.
Rendering Speed Considerations
All rendering is done within a context. The same can be said for anything that you do as a person. You might study in the library, or study while watching a football game. The context you are in affects your studying! And people context switch all the time, either consciously or unconsciously. If you are thinking deeply about something, it might take you a few seconds to recognize that someone is talking to you. All context switching takes time. If you are constantly context switching you will not be very productive.
All modern-day computers are constantly context switching between running processes. The GPU is no different. You are always rendering within a context. The fewer times that you switch contexts, the faster your rendering. So when you setup a rendering process, one of your main goals should be to minimize the amount of context switching. All of the following actions cause a GPU to context switch:
- Selecting a shader program.
- Setting the value of a
uniformvariable in a shader program. - Attaching an
attributevariable to a buffer object. - Any action that changes the state of the
glJavaScript object.
Any communication between your JavaScript program and the GPU slows down rendering. To get maximum rendering speeds you need to minimize JavaScript function calls to the WebGL API. For example, you can have a separate buffer object for every model, or you can store several models in a single buffer object. The number of possible memory configurations is very large. You will have to constantly make trade-offs between the desire for fast rendering, the amount of memory you use for your graphics data, and the complexity of your code.
Let’s say it again, any communication between your JavaScript program and the GPU slows down
rendering. In the ideal case you will copy all of your model data to the GPU
only once. Then, when you render, the GPU already has most of the data it needs.
In cases where model data must be manipulated by your JavaScript code before
each rendering, the transfer of the data from RAM to the GPU’s memory
will be a major time constraint. In such cases you will want to separate your
model data into its various data types and only transfer the data that is
changing. For example, if your model data included vertices, colors, and normal
vectors, and only your color data is being manipulated by your JavaScript
program, then you would put the vertex and normal vector data into a GPU
buffer object and your color data into a separate buffer object.
When you render the model, your JavaScript code will change the color values,
copy them to a GPU buffer object, and then call gl.drawArrays().
Minimizing the amount of data that is copied to the GPU on each render
will speed up rendering.
In general, you should get your graphics to render correctly before trying to optimize it for faster rendering. You will be surprised at how fast the GPU is and in many situations no optimization will be needed. For these tutorials, we will write JavaScript code and organize model data such that it emphasizes clarity – not rendering optimization.
Code and Data Dependencies
WebGL programs render models using three major components:
- A shader program that manipulates vertex locations and assigns colors to pixels. Shader programs execute on the GPU.
- Vertex object buffers that store model vertex attribute data on the GPU.
- JavaScript code that sets up and initiates rendering. The JavaScript code is executed by the CPU.
These three components are intertwined to the extent that a simple change in one component will typically require a change in all of the other components. This is regrettable because it makes incremental code development difficult. In any case …
Caution
If you modify a shader program, a buffer object, or a JavaScript rendering function, make sure the other related components are compatible with your changes.
Glossary
- shader program
- a computer program written in GLSL (GL Shader Language) that runs on the GPU. It preforms the programmable parts of the graphics pipeline.
- vertex shader
- a computer program written in GLSL that positions the geometry of models in a scene.
- fragment shader
- a computer program written in GLSL that assigns a color to the
fragments(pixels) that compose a point, line or triangle. - pixel
- a single color value in a raster image.
fragment- a group of data values used to calculate the color for an individual pixel.
gl- the typical name of the JavaScript object that holds a WebGL context for a canvas. All WebGL functionality is accessed through this object.
uniform- a value that stays constant while rendering an array of vertices.
attribute- a value that changes for every vertex during an execution of the graphics pipeline.
varying- a value that changes for every
fragmentof a point, line, or triangle. - context switching
- a change in the environment (or context) in which a process is executing. Excessive context switching greatly slows down execution speeds.
Self-Assessments
-
Q-90: How many times do you have to get a WebGL context for the HTML canvas element you are rendering to?
- Once.
- Correct. There is only one WebGL context for a HTML canvas element and you just need to retrieve it once.
- Twice.
- Incorrect. Why twice?
- Each time you render to the HTML canvas element.
- Incorrect.
- Each time you render a different model to a scene.
- Incorrect.
        Q-92: Q-91: Please correctly order the following **pre-processing steps** needed for rendering.Get the HTML *canvas* element you will be rendering into.
---
Get a WebGL *context* for the canvas element.
---
Compile and link your *vertex shader* and your *fragment shader* programs
into a *rendering program*.
---
For each model in your scene:

  #. Convert your OBJ model data into appropriate arrays of data for rendering.
  #. Create one or more *buffer objects* in the GPU's memory.
  #. Copy your model data into the *buffer object(s)*.
---
Get references to the variables in your *shader rendering programs* so you can
set their values at render time.
---
-
Q-93: A WebGL
- A collection of data related to a single pixel.
- Correct. A fragment is all of the data stored for an individual pixel.
- All of the pixels that are assigned a color for a specific triangle.
- Incorrect. All of the pixels that are assigned a color for a specific triangle are a group of fragments.
- A small part of the output rendering buffer.
- Incorrect.
- One triangle of a triangular mesh.
- Incorrect.
fragment is …
-
Match each type of shader program variable with its correct definition.
Please try again!
- uniform
- A value that is the same for an entire execution of the graphics pipeline.
- attribute
- A value that changes for every vertex as the graphics pipeline is processing vertices.
- varying
- A value that changes for every fragment as the graphics pipeline is processing fragments.
-
Match each type of shader program with its correct definition.
What does a fragment shader process?
- Vertex shader
- Transforms each vertex of a model to its correct location for the current scene.
- Fragment shader
- Assigns a color to each fragment (pixel) that composes a geometric primitive (point, line, or triangle).