4.4 - Ply Data Format
Another cross-platform file format that is useful for transferring data between modelers is the Stanford’s PLY file format. This format is needed if you want to associate a different color with specific vertices of a face. (The OBJ file format only allows you to assign a material property (color) to a complete face (or triangle), not individual vertices.
Exporting PLY Data from Blender
As previously stated, always save your models in the native Blender format
which uses a .blend file extension. This guarantees that all
attributes of your models can be retrieved if you open and edit the models
at a later time.
Note: Exporting complex geometry to a PLY data file typically fails with errors in Blender 2.76. Only use PLY files for simple models.
A PLY file contains a single model. If you have multiple models in a Blender scene, you must save them one model at a time.
If you want to export model data to a PLY data format, do the following:
Select the
Filemenu,Exportcommand, and theStanford (.ply)sub-command.Enter an appropriate file name. Don’t include any spaces in your name and use all lower cases letters. The filename will be used to name the model. The contents of a PLY file does not contain a model name.
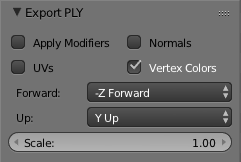
In the lower left corner there is a set of options for the export. Set the options as follows:
Apply Modifiers: OFFUV's: OFF (Unless you defined a texture map, which we will cover later.)Normals: OFF (To make the file as small as possible.)Vertex Colors: ON (To specify a different color for each vertex.)Forward:: -Z Forward (To rotate to a WebGL orientation.)Up:: Y Up (To rotate to a WebGL orientation.)
An example of the export settings can be seen in the following image:

Select the “Export PLY” button in the upper-right corner.
Example PLY Data File
A PLY data file is “self-documenting” in that the header of a file defines
the format of the data in the file. The standard “elements” of a PLY file
are vertex, face, tristrips (triangle strips), and edge. The
order of elements in the header determines the order they are stored in
the file. The header defines the data type and a “name” for each property
of an element. Again the ordering of the property definitions determines
the order of the data for each element. The standard “names” for vertex
properties are x, y, z for the position of a vertex,
nx, ny, nz for a vertex normal vector, s, t for
texture coordinates, and red, green, blue, alpha
for a color.
The example PLY file below describes a simple cube. The header is highlighted in yellow.
In this example, each vertex is defined by an (x,y,z) position and a
(red, green, blue) color.
ply
format ascii 1.0
comment Created by Blender 2.79 (sub 0) - www.blender.org, source file: ''
element vertex 8
property float x
property float y
property float z
property uchar red
property uchar green
property uchar blue
element face 6
property list uchar uint vertex_indices
end_header
2.000000 0.000000 -2.000000 255 255 0
2.000000 0.000000 0.000000 255 0 0
0.000000 0.000000 0.000000 0 0 0
0.000000 0.000000 -2.000000 0 255 0
2.000000 2.000000 -2.000000 255 255 255
0.000000 2.000000 -2.000000 0 255 255
0.000000 2.000000 0.000000 0 0 255
2.000000 2.000000 0.000000 255 0 255
4 0 1 2 3
4 4 5 6 7
4 0 4 7 1
4 1 7 6 2
4 2 6 5 3
4 4 0 3 5
File Format Details
All of the details for an PLY file are beyond the scope of these tutorials. If you are interested in more details, http://paulbourke.net/dataformats/ply/ is an excellent reference.
A WebGL Example Using PLY Data
This textbook provides a JavaScript function that reads an PLY data file and converts it
into arrays of type Float32Array ready for GPU rendering buffers. The function is
called CreateModelFromPLY and it returns an array containing one model. The model
is composed of points, lines, and triangles. The model is stored in a ModelArrays
JavaScript object (which was defined in the previous lesson).
Animate
Glossary
- PLY file format
- A cross-platform, text or binary based file format for the exchange of geometry modeling data.
Self-Assessment
Using Blender, export a model to a PLY file. Then use a text editor to open the PLY file and examine its contents. Change one or more things about your model in Blender and export it to a new PLY file. Compare and contrast the two PLY files to see what changed.