9.6 - Scissoring
Built into the graphics pipeline is functionality called scissoring. Scissoring allows you to restrict which pixels in the render buffer the pipeline can modify. When you restrict rendering to a sub-area of the render buffer, the entire rendering is mapped into this sub-area. This allows you to create multiple renderings in a single canvas.
The scissoring operation is not enabled unless you call gl.enable()
with the gl.SCISSOR_TEST flag. Scissoring can be disabled by calling gl.disable().
If you are rendering multiple scenes into a canvas, you only need to enable
scissoring once in your pre-processing code. Here are example calls:
// Turn on the scissor test
gl.enable(gl.SCISSOR_TEST);

// Turn off the scissor test
gl.disable(gl.SCISSOR_TEST);
Scissoring Parameters
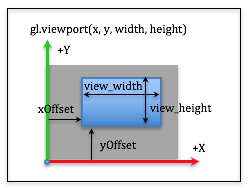
To specify the sub-area of the render buffer that you want to render into, you use the same parameters as a viewport, as in this example call:
// set the scissor rectangle
gl.scissor(xOffset, yOffset, width, height);
Distinct Scissor Areas
Please experiment with the following WebGL program which renders four scenes into a single canvas. This is a typical layout for some modeling tools which shows a top, front, and side view of a model, along with a perspective view.
Experiment with scissoring.
| Top View | Perspective View |
| Front View | Right Side View |
Manipulate the sizes of the scissor and viewport areas:
| x_divide : | 150 | 50 250 |
| y_divide : | 150 | 50 250 |
Show the scissor and viewport boundaries
As you experiment with the example WebGL program above, please verify that you understand the following ideas:
- Scissoring is typically enabled once in your pre-processing code. (See line 233.) In complex rendering scenarios, scissoring can be enabled and disabled during the rendering process.
- Scissoring determines which part of the rendering buffer is modified, while the viewport command determines where and how big the rendering is mapped to the canvas. The scissor parameters and the viewport parameters do not have to be the same. However, since scissoring prevents changes to the render buffer anywhere outside its defined limits, any portion of the viewport that is outside the scissor sub-area will not be rendered.
- Rendering into a scissored sub-area requires that you set the aspect
ratio of your projection to be the same aspect ratio as the sub-area.
If the aspect ratios are different, the rendering will be distorted. Notice
that the projection matrix is redefined for each
rendering to match the aspect ratio of the scissored sub-area. Try replacing
line 147 with
matrix.createPerspective(45.0, 1.0, 1.0, 30);and see what happens.
Scissor Overlays
Below is another WebGL program you can experiment with. A scene is rendered into the overall canvas and then scissoring is used to render a different scene into a sub-area of the canvas. If you click and drag inside the sub-area you can move the location of the sub-area – similar to how many video phone apps function, such as FaceTime.
Experiment with a Scissor Overlay
Drag the subarea to change its location.
Manipulate parameters of createPerspective(fovy, aspect, near, far):
| fovy (field-of-view y) : | 45 degrees | 5.0 179 |
| aspect ratio : | 1.0 | 0.1 5.0 |
| near : | 2.0 | 0.1 10.0 |
| far : | 10.0 | 2.0 20.0 |
As you experiment with the example WebGL program above, please verify that you understand the following ideas:
- The initial rendering is done using the entire canvas (i.e., the entire render buffer).
- The second rendering is done on a scissored subarea starting at line 153.
- The colors in the render buffer and the depth values in the depth buffer
must be cleared to ensure that the first rendering does not affect the
second rendering. (See lines 109 and 157.) The flags to the
gl.clear()function are bit flags, so make sure you use the bitwise or operator,|, and not the logical or operator,||. - Using a different clear color for the two renderings makes it clear where the scissored subareas are located.
- The code that allows you to drag the smaller subarea is in the mouse drag
event handler,
self.mouse_dragged, in theScissoring2Eventsclass object. The current code allows a user to drag the subarea outside the canvas. This could be prevented with appropriateif statementsin the event handler function.
Glossary
- Scissoring
- Restrict the graphics pipeline to only allow modification of a rectangular subarea of pixels in a render buffer. A rendering is mapped into this subarea as if it was the entire canvas. Scissoring must be enabled before it can be used.