6.9 - Chaining Transformations - Adding an Upper Arm
The previous lesson demonstrated a robot arm with one linkage. This lesson will demonstrate how to chain transforms together to add a second linkage.
A Robot Arm - The Upper Arm
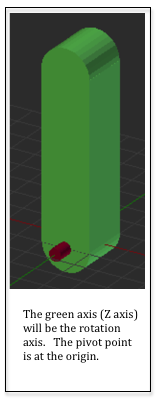
The upper arm of our robot is created in Blender and its local origin is set at (0,0,0) so that it can be easily rotated. It’s axis of rotation is the Z axis. Examine the image of the upper arm to the right.
The upper arm will pivot about the end of the forearm. But rotation is about the origin. We need to rotate the upper arm about the origin, and then move it to the end of the forearm. But the forearm is rotating, as well as the base. So how do we get the upper arm to the right place? We use the transforms that are positioning the forearm! Here’s the transforms we need to apply to the upper arm, in this order:
- Rotate it to a desired angle about its red pin.
- Translate it to the end of the forearm.
- Rotate it based on the forearm’s angle.
- Translate it to the base’s red pin.
- Rotate it according to the base’s rotation angle.
The transformation for the upper arm needs to be the following:
=baseRotation
*translateToPin
*rotateForearm
*translateToForearmEnd
*rotateUpperarm
Eq2
Hopefully you are seeing a pattern here!
Scene Rendering Initialization
The demo program below is a modified version of the code from the previous lesson. It adds an “upper arm” model to the robot arm. We need two new transform matrices to manipulate the upper arm. One transform will rotate the arm about it’s pivot pin. The rotation will possibly change on each new frame, so this matrix will be created in the initialization code but assigned its value in the frame rendering function. The translation matrix can be create and assigned its value once, since the distance to the end of the forearm is a constant and never changes. Study the example code and then review the code description below. If you want to experiment, the demo code is modifiable.
/** * robot_base_scene.js, By Wayne Brown, Fall 2017 *//** * The MIT License (MIT) * * Copyright (c) 2015 C. Wayne Brown * * Permission is hereby granted, free of charge, to any person obtaining a copy * of this software and associated documentation files (the "Software"), to deal * in the Software without restriction, including without limitation the rights * to use, copy, modify, merge, publish, distribute, sublicense, and/or sell * copies of the Software, and to permit persons to whom the Software is * furnished to do so, subject to the following conditions: * * The above copyright notice and this permission notice shall be included in all * copies or substantial portions of the Software. * THE SOFTWARE IS PROVIDED "AS IS", WITHOUT WARRANTY OF ANY KIND, EXPRESS OR * IMPLIED, INCLUDING BUT NOT LIMITED TO THE WARRANTIES OF MERCHANTABILITY, * FITNESS FOR A PARTICULAR PURPOSE AND NONINFRINGEMENT. IN NO EVENT SHALL THE * AUTHORS OR COPYRIGHT HOLDERS BE LIABLE FOR ANY CLAIM, DAMAGES OR OTHER * LIABILITY, WHETHER IN AN ACTION OF CONTRACT, TORT OR OTHERWISE, ARISING FROM, * OUT OF OR IN CONNECTION WITH THE SOFTWARE OR THE USE OR OTHER DEALINGS IN THE * SOFTWARE. */"use strict";//-------------------------------------------------------------------------/** * Initialize and render a scene. * @param id {string} The id of the webglinteractive directive * @param download {SceneDownload} An instance of the SceneDownload class * @param vshaders_dictionary {object} A dictionary of vertex shaders. * @param fshaders_dictionary {object} A dictionary of fragment shaders. * @param models {object} A dictionary of models.A robot arm with 2 linkages.
Forearm angle about Z axis: 0.00 :
-90.0 90.0
Upper arm angle about Z axis: 0.00 :
-90.0 90.0
Animate
Concerning the pre-processing actions that happen once when the constructor code is executed:
| Line(s) | Description |
|---|---|
| 67-68 | Two new transforms are created to manipulate the upper arm. |
| 175 | The translation for the upper arm is set to a constant 8 units along Y. |
| 74 | A public class variable, self.upperarm_angle, is created to
store the angle of the upper arm. It is
made public so the HTML slider event handler can change its value. |
| 170-171 | Buffer objects in the GPU are created and the model data is copied to the GPU for the upper arm model. |
Each time the scene needs to be rendered, the render function in lines
80-115 is called. This function is identical to the previous demo version with the
following exceptions:
| Line(s) | Description |
|---|---|
| 107 | The rotation matrix for the upper arm is set because the rotation of the forearm can change on each frame. |
| 110-111 | The transform for the upper arm is calculated. Notice that the base rotation and the forearm transforms are included. Also notice the ordering of the transforms from right to left. The order of the transforms is critical. |
| 114 | The upper arm model is rendered using the calculated transform. |
